
Fun and Games
Rubik Cube Solution
This page walks through a solution of the Rubik Cube. It will work through the cube solving each of the three layers of cubelets in turn.
Notation
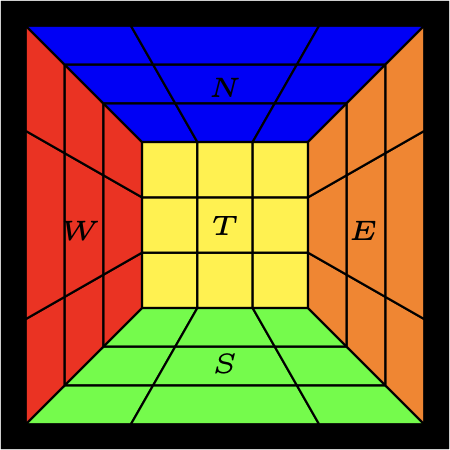
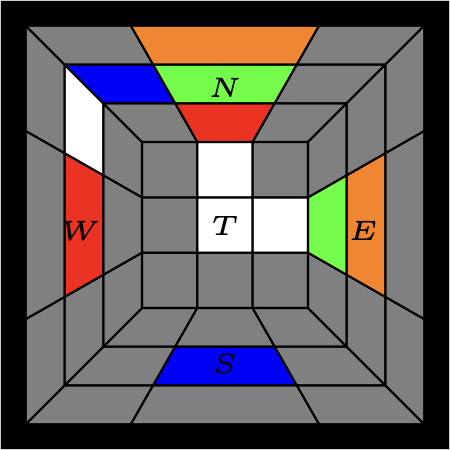
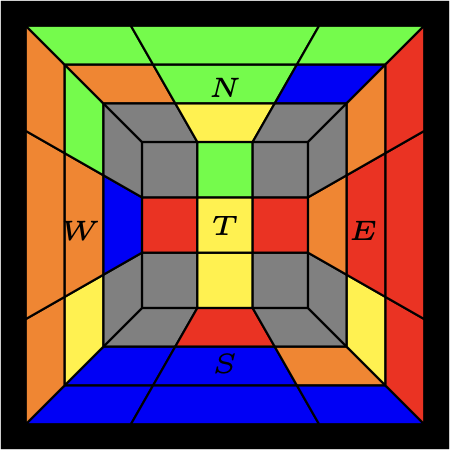
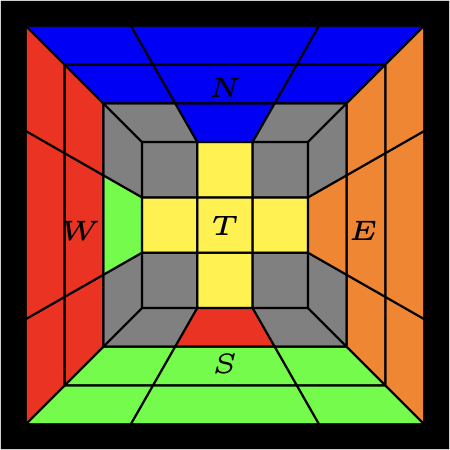
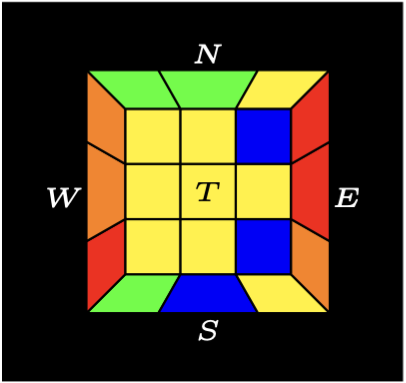
Rubik Cube 1 shows five of the six faces looking at it from above. The bottom face is white. The cube is composed of 26 cubelets. There are three types of cubelet.
-
Centre cubelets: there are 6 of these in the centre of each face. They can’t be changed.
-
Edge cubelets: there are 12 of these each of which is adjacent to two centre cubelets.
-
Corner cubelets: there are 8 of these each of which is adjacent to three edge cubelets.
The faces for the cube in its current orientation are labelled Top, West, North, East, South, and Bottom. In later diagrams T may not be yellow and S may not be green.
We will need to make sequences of rotations of cube faces. Rotations are referred to by the letter associated with the face. Rotations are clockwise when looking at the face.
-
T is rotating the Top face 90° clockwise.
-
N is rotating the North face 90° clockwise - rotate the top face cubelets left.
-
E is rotating the East face 90° clockwise - rotate the top face cubelets away from you.
-
S is rotating the South face 90° clockwise - rotate the top face cubelets right.
-
W is rotating the West face 90° clockwise - rotate the top face cubelets towards you.
-
B is rotating the Bottom face 90° clockwise - rotate it anticlockwise when looking from above.
When a -1 suffix is added to a rotation \(T^{-1}\) etc it means a rotation in an anticlockwise direction. When a 2 suffix is added to a rotation \(T^2\) etc it means a 180° rotation (the direction doesn’t matter).
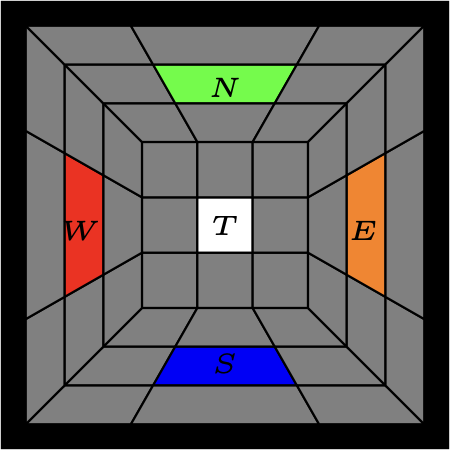
In subsequent diagrams, if a cubelet face is coloured grey it means that its colour doesn’t matter for the current operation.
White Face Layer
First of all get one face of the cube, I chose the white face, with all of its eight movable cubelets in the correct position.
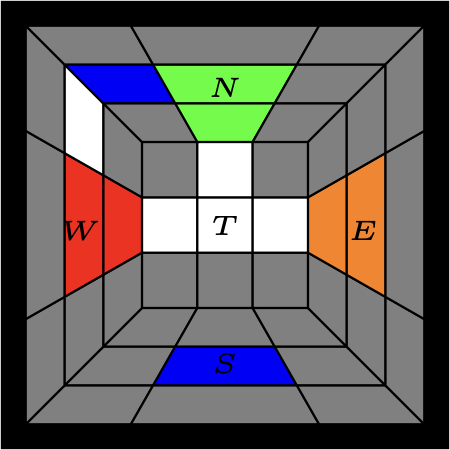
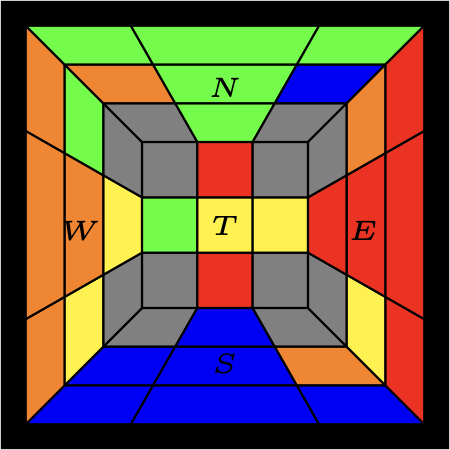
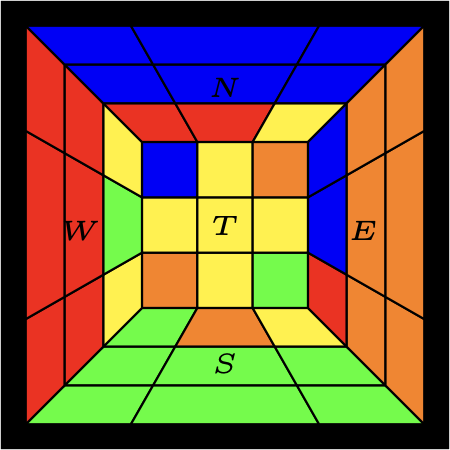
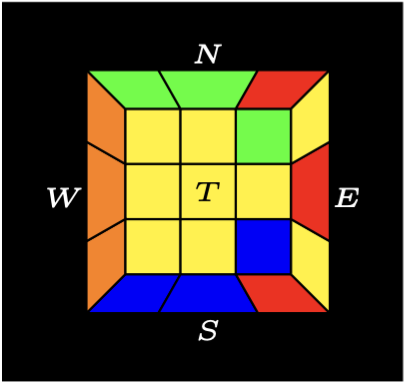
Rubik Cube 2 show an orientation of the cube only knowing the centre cubelets. Now locate the 4 edge cubelets with a white face.
White Edge Cubelets
The four white faced cubelets can be in any six positions and orientations.
-
On the top layer white face on top.
-
On the top layer white face on a side.
-
On the middle layer.
-
On the bottom layer white face down.
-
On The bottom layer white face on a side.
-
If there is more than cubelet with a white face on top, one can be in the wrong position.
A white face on the middle layer is the easiest to position as it only requires a single face rotation to put it on top.
All other white faces can be positioned by first rotating it onto the middle layer and then rotating it onto the top.
Step 1 First White Edge
If there is already a white face on top skip to the next step.
In the example the first white edge can be placed with an \(S^{-1}\) rotation.
Step 2 Second White Edge
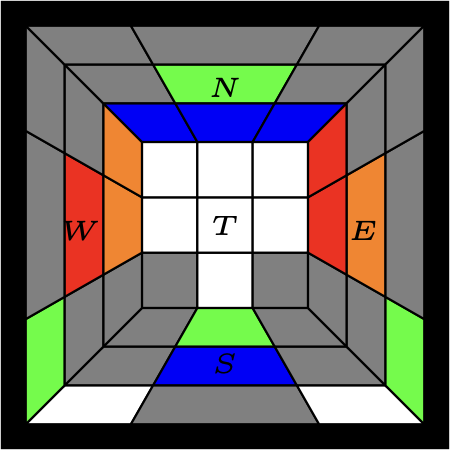
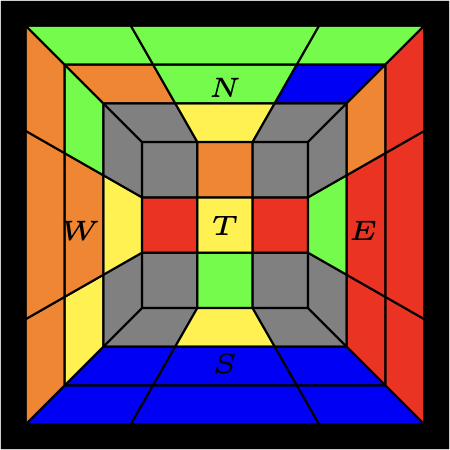
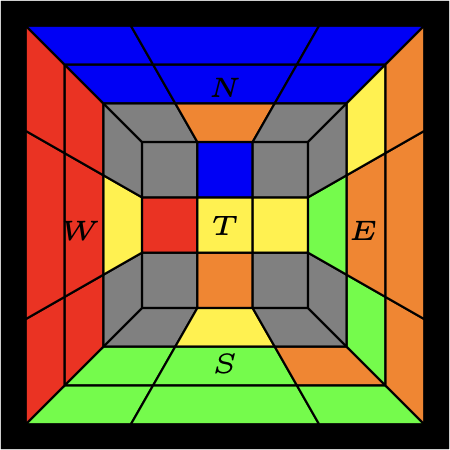
Rubik Cube 4 shows the first white edge cubelet on the top face. Notice that this cubelet is not in its final position is red which means that it should be on the West face. This doesn’t matter for now. What does matter is that the next white edge can only be rotated into one of the three available positions.
The green and white edge cubelet on the middle row can be rotated to white face up with a \(E^{-1}\) rotation. This will put the green face in the East position when it needs to be in the West position. A \(T^2E^{-1}\) sequence will put a second white edge cubelet in place.
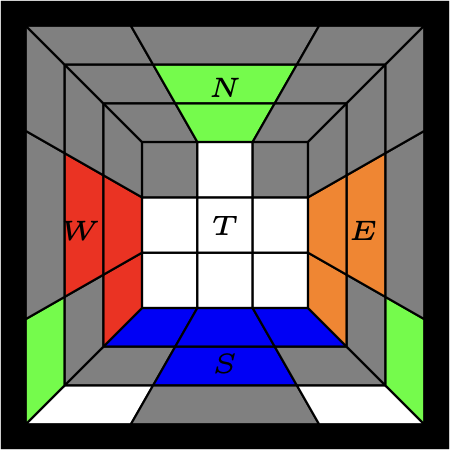
Step 3 Third White Edge
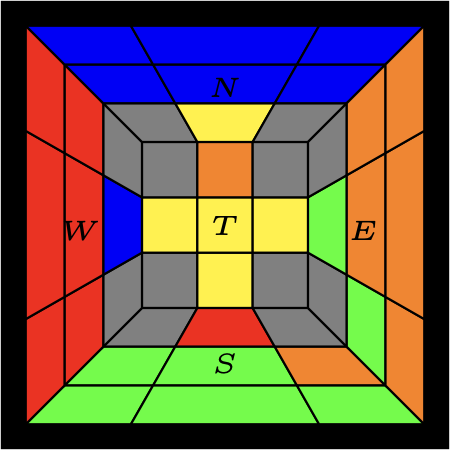
Rubik Cube 5 shows two white edge cubelets on the top face. The orange edge face on the bottom layer North has a white face at the bottom. If the bottom layer is rotated to the East face then it can be rotated to the top. It must go into the Top face at what is now the South position. A \(T^{-1}B^{-1}E^2\) sequence will put it in the right place.
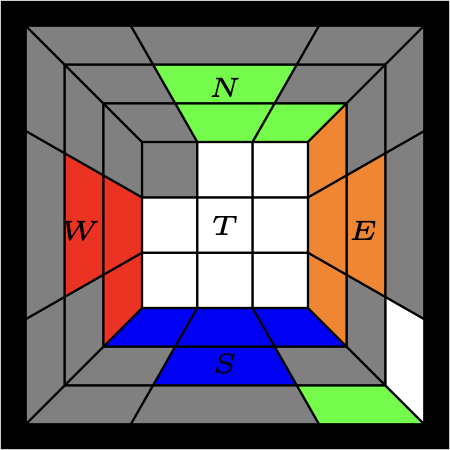
Step 4 Fourth White Edge
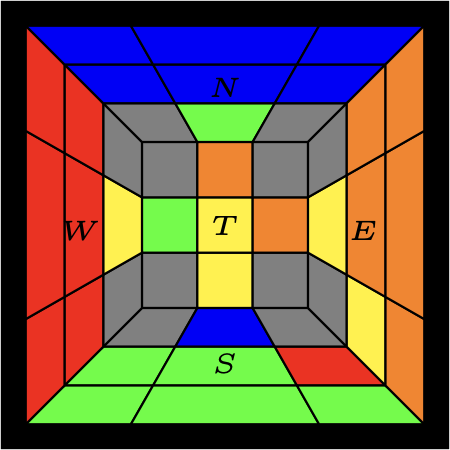
Rubik Cube 6 shows three white edge cubelets on the top face. The final white edge can be rotated into the final slot using the sequence \(T^2N^{-1}\).
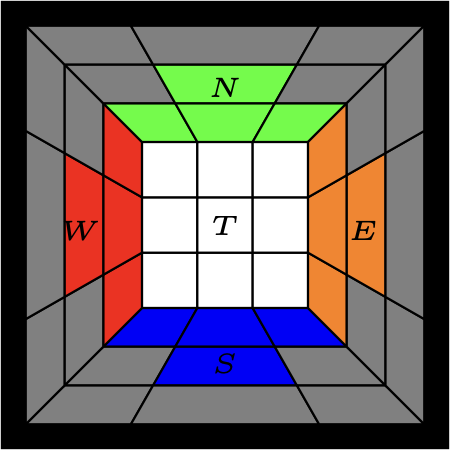
This completes the white edge cubelet positioning
White Corner Cubelets
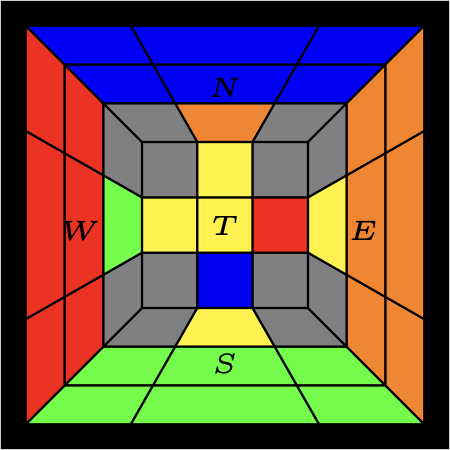
Rubik Cube 7 shows the four white edge cubelets in position and the locations of the four white corner cubelets. The orientation of the top face doesn’t matter at this stage.
There are four white corner cubelets. On the top face the NE cubelet is in the correct position. The NW cubelet should be at SW. The SE cubelet is in the right place but in the wrong orientation. The bottom layer NW cubelet should be NW on the top layer.
The process requires exchanging a top layer corner cubelet with a bottom layer cubelet until they are all in place. When exchanging, we want to put any white faces on the side, not on the bottom.
Start by moving the top SE cubelet to the bottom layer using \(E^{-1}B^{-1}E\).
Rubik Cube 8 shows the result of the movement. The next move can be to exchange the top NW and the bottom SE cubelets putting the top NW cubelet in the correct position. The sequence \(W^{-1}B^2W\) will do this.
Rubik Cube 9 shows the result of the exchange. We need a missing top while face opposite a bottom white face. This would be a good time to orient the top face with the other centre cubelets using \(T^2\).
Rubik Cube 8 shows the result of the rotation. A next move can be to exchange the top NE and bottom SE cubelets using \(N^{-1}BN\).
Rubik Cube 8 shows the result of the sequence. The final white corner can be placed using \(N^{-1}B^2N\).
Rubik Cube 12 shows the result of the sequence.
Congratulations the white layer is now complete!
Middle Layer
Now that the white layer has been solved, turn the cube white side down and locate the eight edge cubelets.
Rubik Cube 13 shows the white side down cube with the remaining eight edge cubelets.
Rotate the top face and/or reorient the cube so that the S face has a matching edge face on the top layer. A \(T^{-1}\) rotation will achieve this.
Rubik Cube 14 shows the return of the rotation. If it is not possible to find a matching face, orient the cube so that the cubelet on the middle layer SE position doesn’t have a yellow face.
Be very careful from now on. If you make a mistake executing a sequence, you may need to restart the whole process!
Rotate the top centre cubelet on the S face to the SE middle layer using \(TET^{-1}E^{-1}T^{-1}S^{-1}TS\).
Rubik Cube 15 shows the result of the sequence. Note that the other middle layer edges are unchanged and the top face cubelets have been rearranged. The top face doesn’t matter at this stage.
There is a green face on the top layer of the E face. Do a \(T^{-1}\) rotation and then rotate the cube 180° so the the S face is green.
Rubik Cube 16 shows the result of the rotations. Now the green top centre S face needs to be rotated to the middle WS. The sequence for this is \(T^{-1}W^{-1}TWTST^{-1}S^{-1}\).
Rubik Cube 17 shows the result of the sequence. A \(T\) rotation will align the N face orange face. Rotate the cube clockwise so the the S face is orange. Again, Rotate the top centre cubelet on the S face to the SE middle layer using \(TET^{-1}E^{-1}T^{-1}S^{-1}TS\). Rotate the cube anticlockwise so that the S face is blue.
Rubik Cube 18 shows the result of the sequence. Three of the middle layer edges are in place and the Fourth is in place but with the wrong orientation. Use the sequence \(TET^{-1}E^{-1}T^{-1}S^{-1}TS\) again, this time to move the middle SE cubelet to the top face.
Rubik Cube 19 shows the result of the sequence. We can complete the middle layer by a \(T^2\) to move the top layer green face to S and then repeat \(TET^{-1}E^{-1}T^{-1}S^{-1}TS\).
Congratulations the middle layer is now complete!
Top Layer Edges
Now for the final layer we can only use sequences that don’t change the other layers.

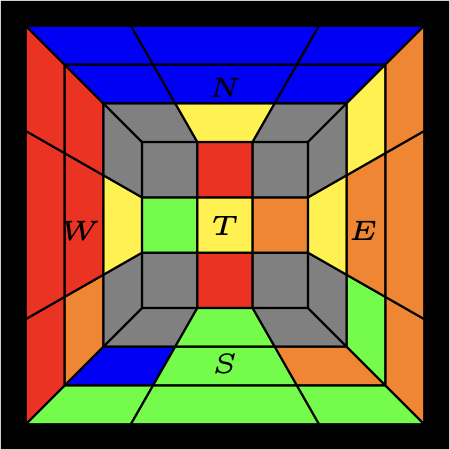
Rubik Cube 20 shows the cube with two layers complete. The blue and green edges are in their correct position. The red and orange edges are in the correct position but with the wrong orientation.
Apply the sequence \(STET^{-1}E^{-1}S^{-1}\).
Rubik Cube 21 shows the result of the sequence.
-
The green W stayed in the same place.
-
The red N rotated to E with the same face on top.
-
The blue E rotated to S and the blue face rotated to the top.
-
The orange S rotated to N and the orange face rotated to N.
Apply the sequence \(STET^{-1}E^{-1}S^{-1}\) again to put all edge yellow faces on top. It maybe necessary to use this sequence several times to get this result.
Rubik Cube 22 shows the result of the sequence. The four edges are not in their correct positions. It is always possible to put one edge cubelet in the W position and the other three can be rotated into their correct position either clockwise or anticlockwise. Rubik Cube 22 has the green cubelet at E and the other three can be put in their correct positions with a clockwise rotation. This can be achieved with the sequence \(E^2TSN^{-1}E^2NS^{-1}TE^2\).
If an anticlockwise rotation is required either apply the clockwise sequence twice.
Rubik Cube 23 shows all of the edge cubelets in their correct position.
Top Layer Corners
The final stage is to get the four top corner layer cubelets in the correct position and orientation. This can be quite complex to solve as it typically takes several sequences to get all four cubelets in the right position and orientation.
Be very careful as it is very easy to make a mistake, particularly in the longer sequences. A mistake in any sequence can scramble the cube and may require starting the solve again!
Top Corner Layer Sequences
There are a number of sequences that change the position and or orientation of 2, 3, or 4 top corner cubelets without changing any others. Applying a sequence a second time produces the opposite effect. Applying it a third times returns to the initial position.

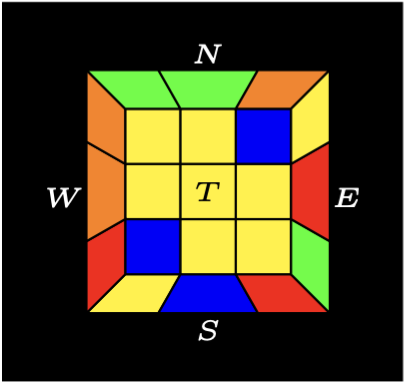
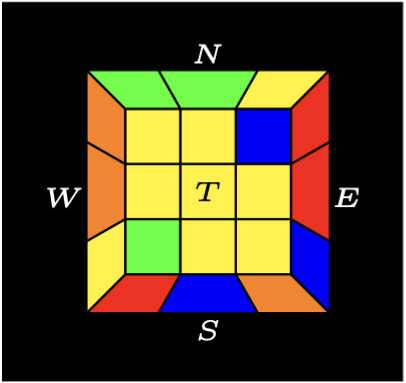
Rubik Cube 24 shows the initial cube top face subsequent diagrams will show the effect of a sequence on the initial top face.
In the following sequences the top row of the diagram shows the effect of the sequence. The bottom row of the diagram shows the effect of applying the sequence a second and third time. For most sequences a third application returns the cube to its initial state. Top left \(\rightarrow\) top right \(\rightarrow\) bottom left \(\rightarrow\) bottom right.
The inverse sequence follows top left \(\rightarrow\) bottom left \(\rightarrow\) top right \(\rightarrow\) bottom right.
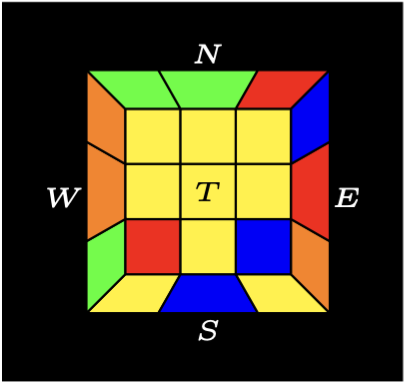
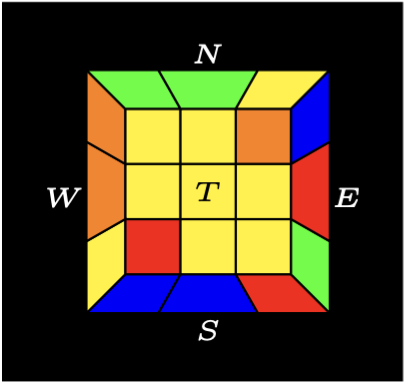
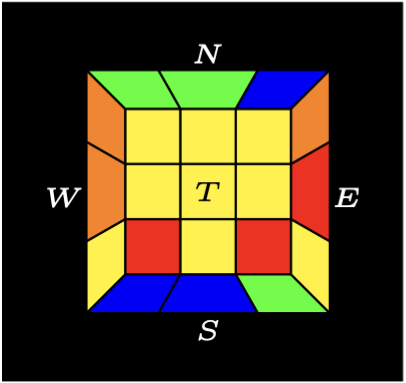
Sequence C1
The sequence \(E^{-1}TWT^{-1}ETW^{-1}T^{-1}\) rotates the NE, SE and SW corner cubelets clockwise.
The inverse sequence is \(TWT^{-1}E^{-1}TW^{-1}T^{-1}E\).
|
|
|
|
|
The SW cubelet becomes the NE cubelet with the T face becoming the E face.
The NE cubelet becomes the SE cubelet with the T face becoming the S face.
The SE cubelet becomes the SW cubelet with the T face becoming the W face.
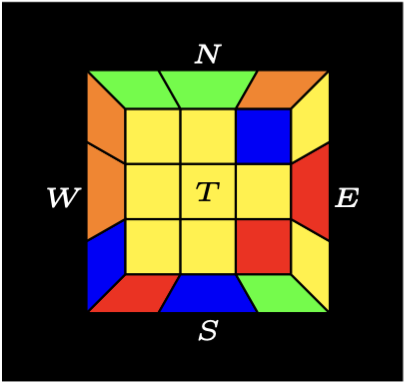
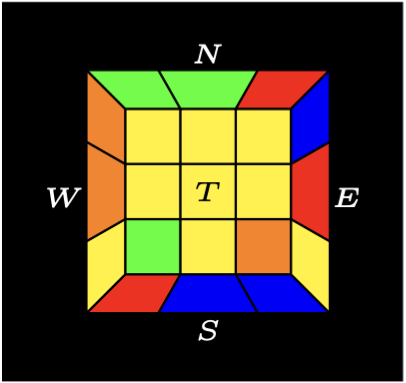
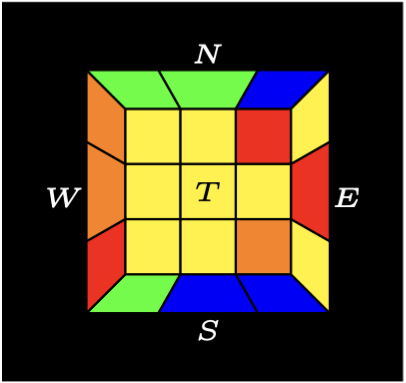
Sequence C2
The sequence \(E^2T^{-1}ETE^{-1}B^{-1}ET^{-1}E^{-1}BTE^2\) rotates the NE, SE and SW corner cubelets clockwise.
|
|
|
|
|
The SW cubelet becomes the NE cubelet with the T face becoming the E face.
The NE cubelet becomes the SE cubelet with the same T face.
The SE cubelet becomes the SW cubelet with the T face becoming the S face.
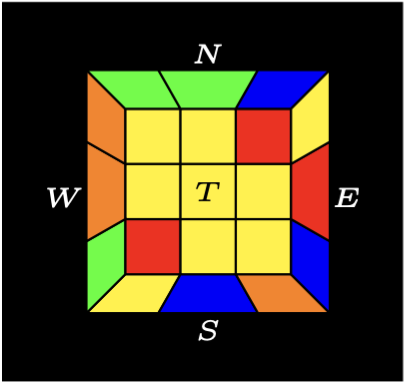
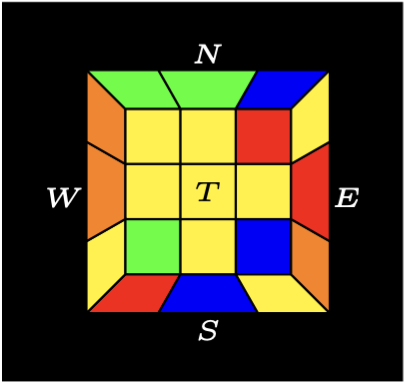
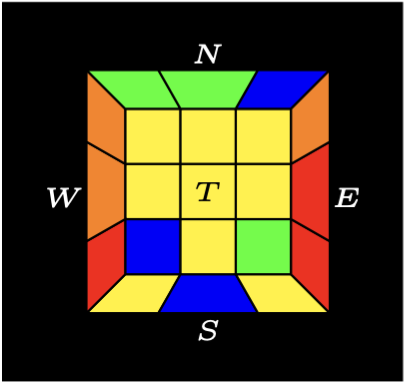
Sequence C3
The sequence \(S^2TSWS^{-1}E^{-1}SW^{-1}S^{-1}ET^{-1}S^2\) rotates the NE, SE and SW corner cubelets clockwise.
|
|
|
|
|
The SW cubelet becomes the NE cubelet with the T face becoming the E face.
The NE cubelet becomes the SE cubelet with the T face becoming the E.
The SE cubelet becomes the SW cubelet with the same T face.
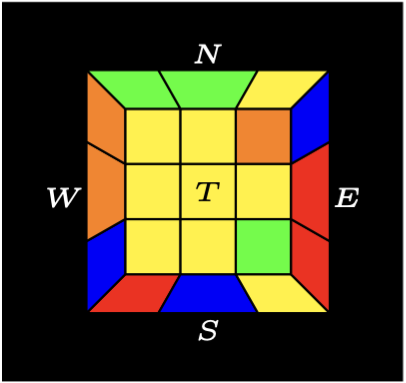
Sequence C4
The sequence \(ENE^{-1}SEN^{-1}E^{-1}S^{-1}\) rotates the NE, SE and SW corner cubelets clockwise.
|
|
|
|
|
The SW cubelet becomes the NE cubelet with the T face becoming the N face.
The NE cubelet becomes the SE cubelet with the same T face.
The SE cubelet becomes the SW cubelet with the T face becoming the W face.
Sequence C5
The sequence \(SB^2N^2BS^2B^{-1}N^2BS^2BS^{-1}\) rotates the NE, SE and SW corner cubelets clockwise.
|
|

|
|
|
The SW cubelet becomes the NE cubelet with the T face becoming the N face.
The NE cubelet becomes the SE cubelet with the T face becoming the E face.
The SE cubelet becomes the SW cubelet with the T face becoming the S face.
Sequence C6
The sequence \(E^{-1}S^{-1}W^{-1}SES^{-1}WS\) rotates the NE, SE and SW corner cubelets clockwise.
|
|
|
|
|
The SW cubelet becomes the NE cubelet with the T face becoming the N face.
The NE cubelet becomes the SE cubelet with the T face becoming the S face.
The SE cubelet becomes the SW cubelet with the same T face.
Sequence C7
The sequence \(N^2W^2NE^2N^{-1}W^2NE^2N\) rotates the NE, SE and SW corner cubelets clockwise.
|
|
|
|
|
The SW cubelet becomes the NE cubelet with the same T face.
The NE cubelet becomes the SE cubelet with the T face becoming the E face.
The SE cubelet becomes the SW cubelet with the T face becoming the W face.
Sequence C8
The sequence \(WS^2WN^2W^{-1}S^2WN^2W^2\) rotates the NE, SE and SW corner cubelets clockwise.
|
|
|
|
|
The SW cubelet becomes the NE cubelet with the same T face.
The NE cubelet becomes the SE cubelet with the same E face.
The SE cubelet becomes the SW cubelet with T face becoming the S face.
Sequence C9
The sequence \(WBENE^{-1}S^{-1}EN^{-1}E^{-1}SB^{-1}W^{-1}\) rotates the NE, SE and SW corner cubelets clockwise.
The inverse sequence is \(WBS^{-1}ENE^{-1}SEN^{-1}E^{-1}B^{-1}W^{-1}\).
|
|

|

|
|
The T faces of all 3 cubelets remain the same.
The SW cubelet becomes the NE cubelet with the W face becoming the E face.
The NE cubelet becomes the SE cubelet with the N face becoming the E face.
The SE cubelet becomes the SW cubelet with the S face becoming the W face.
Sequence C10
The sequence \(E^{-1}BESBS^{-1}TSB^{-1}S^{-1}E^{-1}B^{-1}ET^{-1}\) changes the orientation of the NE and SE cubelets without moving any cubelets.
|
|
|
|
|
The NE cubelet T face becomes the E face.
The SE cubelet T face becomes the E face.